Master These 10 Essential Fly Fishing Knots

Your connection to the fish is only as strong as your weakest knot. Whether you're rigging up a new reel or swapping flies streamside, the ability to tie solid, dependable knots separates frustrated anglers from successful ones. This guide covers the ten knots that will handle virtually every situation you'll encounter on the water.
The Importance of Practicing Your Knots
Practicing knot tying is crucial for several reasons:
Build Muscle Memory — When your hands are cold, wet, or shaking from excitement after a strike, you need knot tying to be automatic. Regular practice at home means your fingers know what to do even when conditions are challenging.
Maximize Your Fishing Time — Every minute spent fumbling with knots is a minute your fly isn't in the water. Anglers who can tie quickly and confidently spend more time actually fishing, which directly translates to more fish caught.
Preserve Line Strength — A properly tied knot retains most of your line's breaking strength. A sloppy knot can reduce it by 50% or more. When that trophy trout finally takes, you want every pound of strength working for you.
Adapt to Any Situation — Different scenarios demand different knots. Knowing multiple options means you can always choose the right tool for the job, whether you're building a leader from scratch or making a quick fly change in fading light.
1. Arbor Knot
Use: Attaching backing to your reel spool
The arbor knot anchors your backing to the reel's center post. While you'll rarely see this knot during actual fishing (hopefully no fish takes you down to the arbor!), it's the foundation of your entire setup.
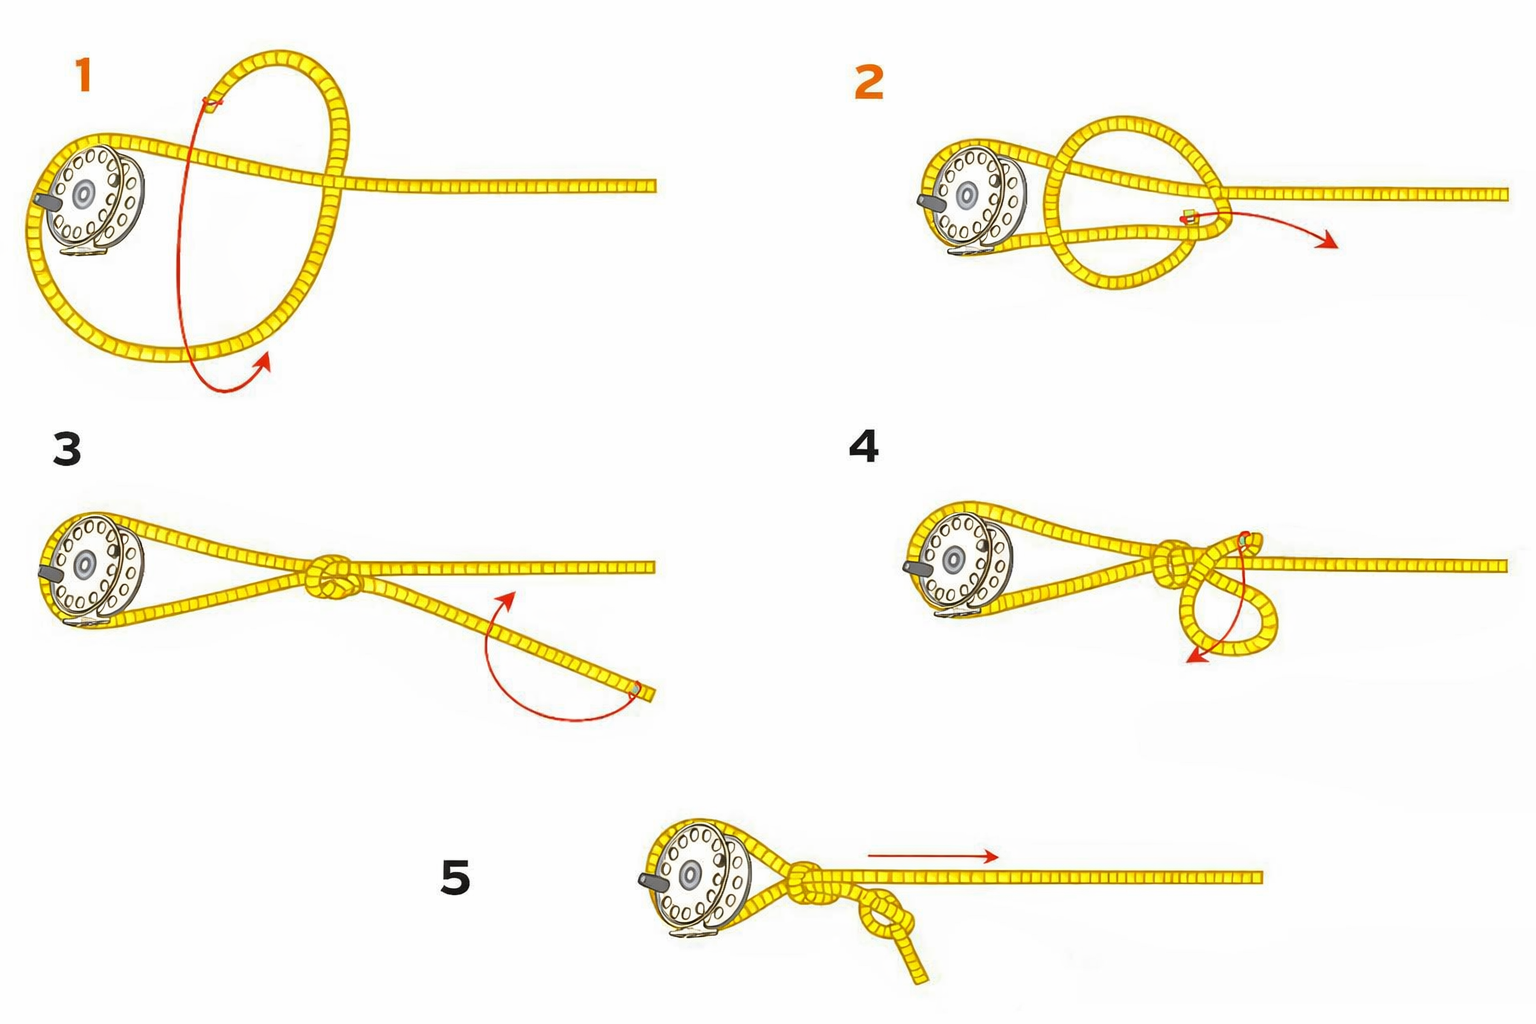
Steps:
- Wrap the backing around the reel arbor
- Tie an overhand knot around the standing line (the main line going back to the spool)
- Tie a second overhand knot in the tag end alone — this acts as a stopper
- Pull the standing line to slide both knots tight against the arbor
- Trim the excess tag end
2. Nail Knot
Use: Connecting backing to fly line, or fly line to leader butt
Named for the nail or tube traditionally used to tie it, this knot creates a slim, smooth connection that glides through your rod guides without catching. It's essential for building a seamless line system.
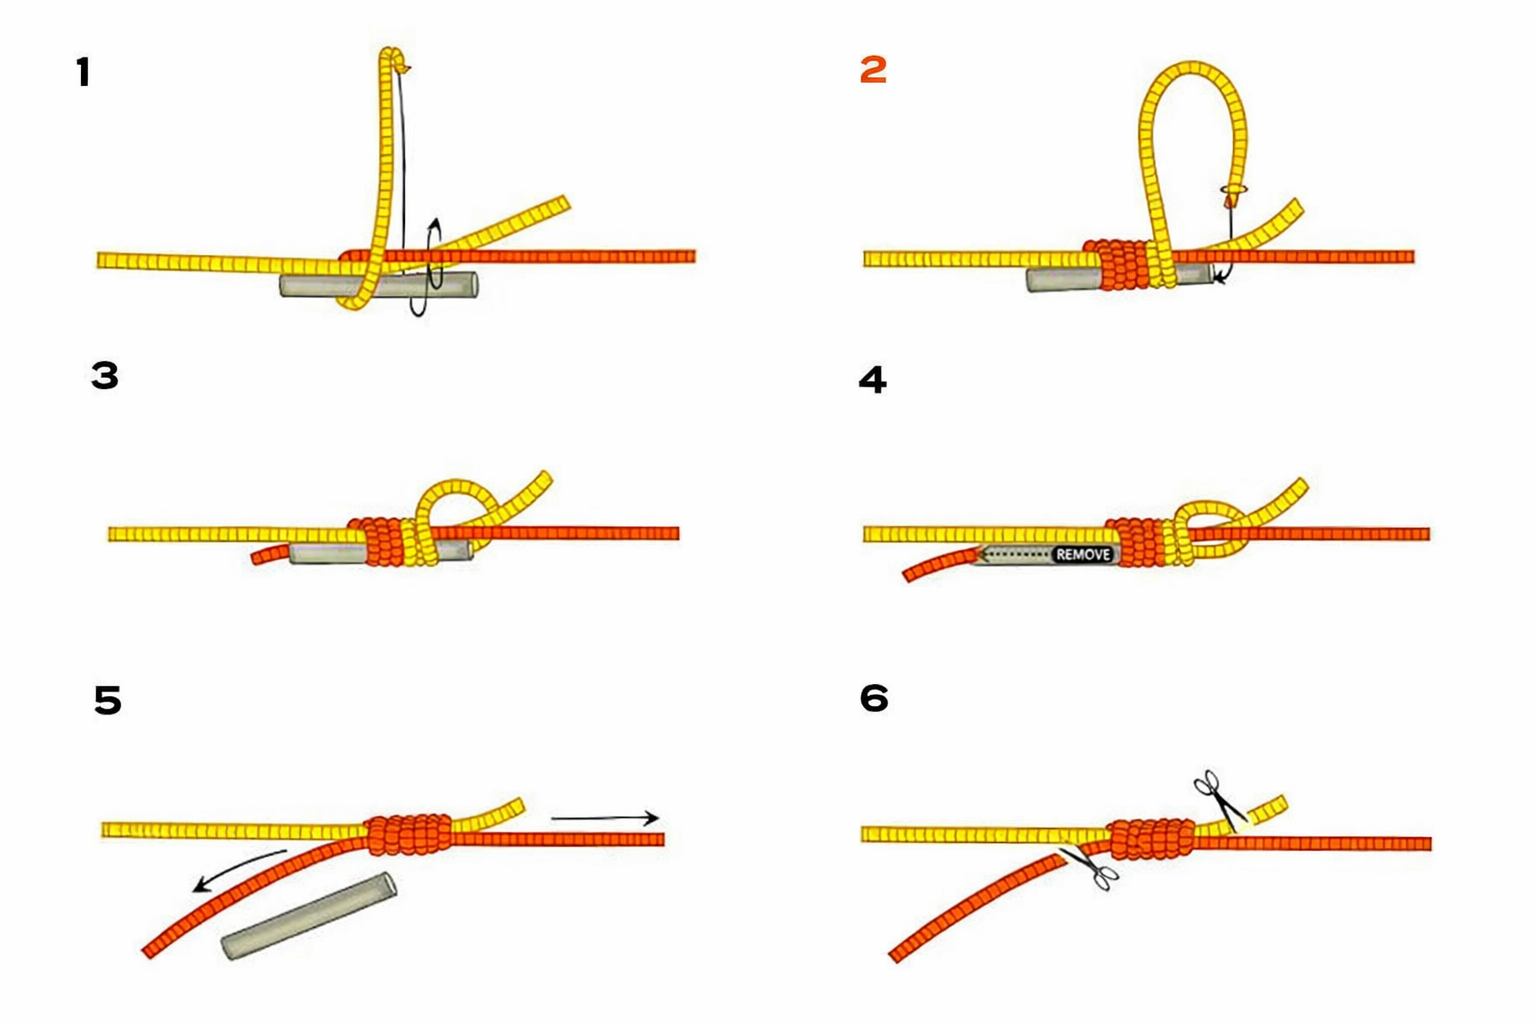
Steps:
- Lay a small tube or nail alongside the end of your fly line
- Place 10 inches of leader material parallel to the fly line and tube
- Wrap the leader back over itself, the fly line, and the tube 5-7 times
- Thread the leader's tag end through the tube (or alongside the nail)
- Carefully remove the tube while holding the wraps
- Pull both ends of the leader to tighten, then trim
3. Loop-to-Loop Connection
Use: Joining fly line to leader, or backing to fly line (when loops are present)
This isn't technically a knot — it's a connection method that lets you quickly swap leaders without cutting your fly line. Most modern fly lines come with factory welded loops, making this the fastest way to rig up.
Steps:
- Pass the leader loop through the fly line loop
- Feed the entire leader (including tippet and fly if attached) through the leader loop
- Pull the lines apart — the loops will cinch together in a secure, interlocking connection
- To disconnect, reverse the process
4. Perfection Loop
Use: Creating a loop at the end of your leader butt section
When you need a loop that sits perfectly in line with your leader, this is the knot. Unlike a surgeon's loop which angles off slightly, the perfection loop aligns straight, ensuring smooth energy transfer during casting.
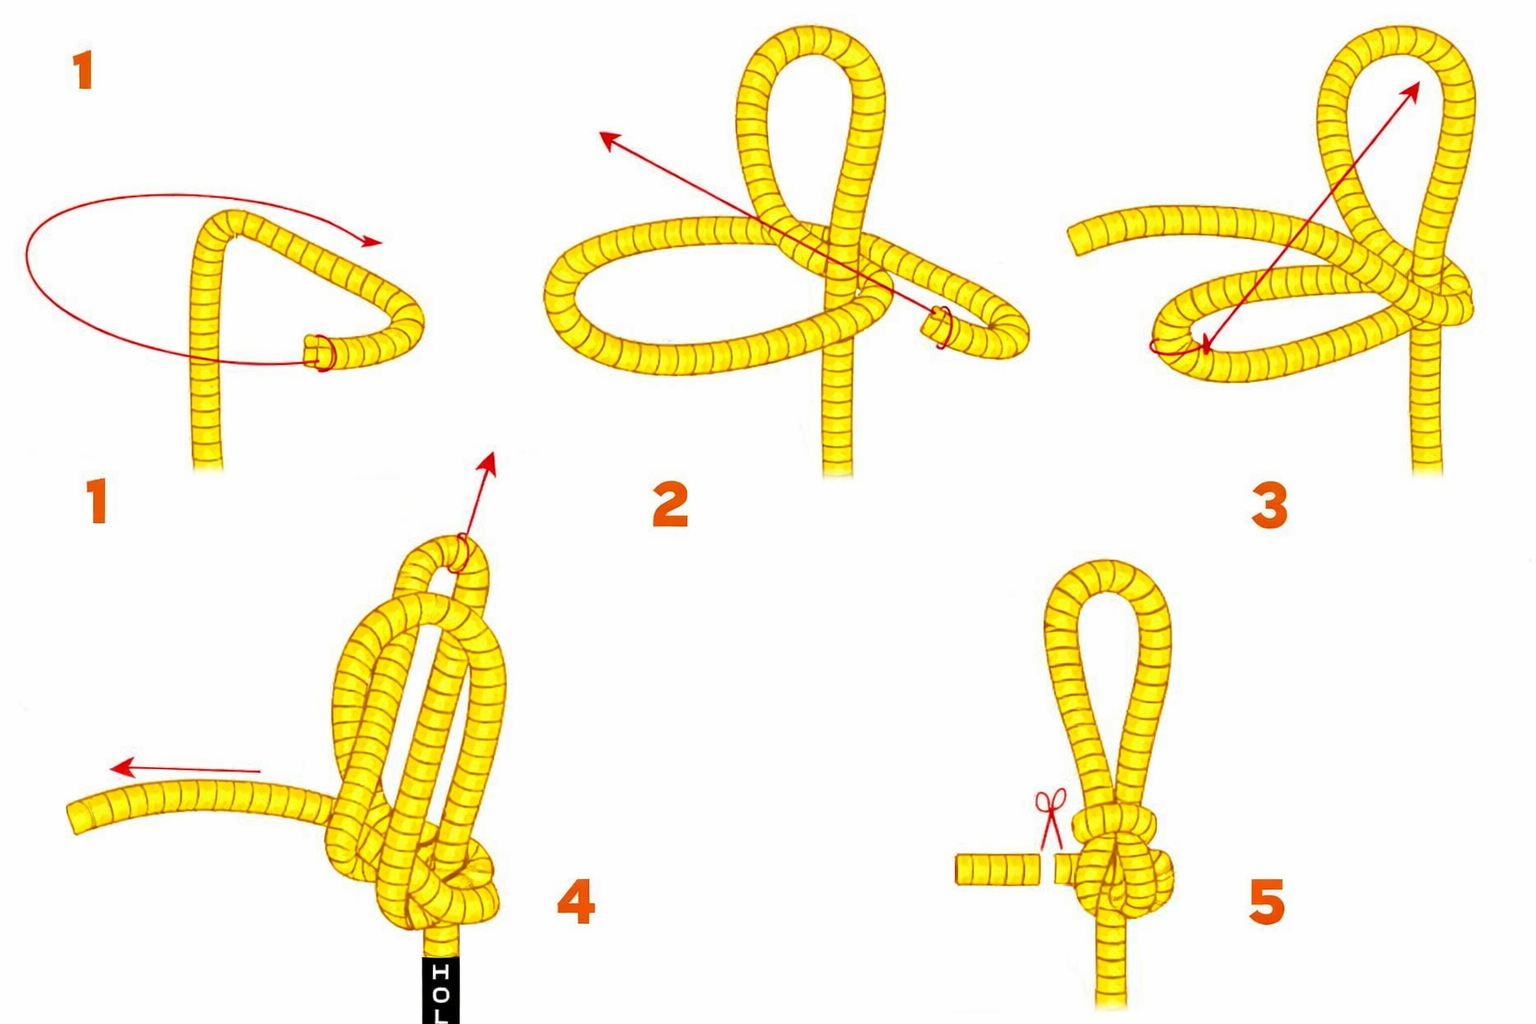
Steps:
- Form a loop by bringing the tag end behind the standing line
- Create a second, smaller loop in front of the first by wrapping the tag end forward
- Pass the tag end between the two loops
- Reach through the first loop and pull the second loop through
- Tighten by pulling the standing line and the loop in opposite directions
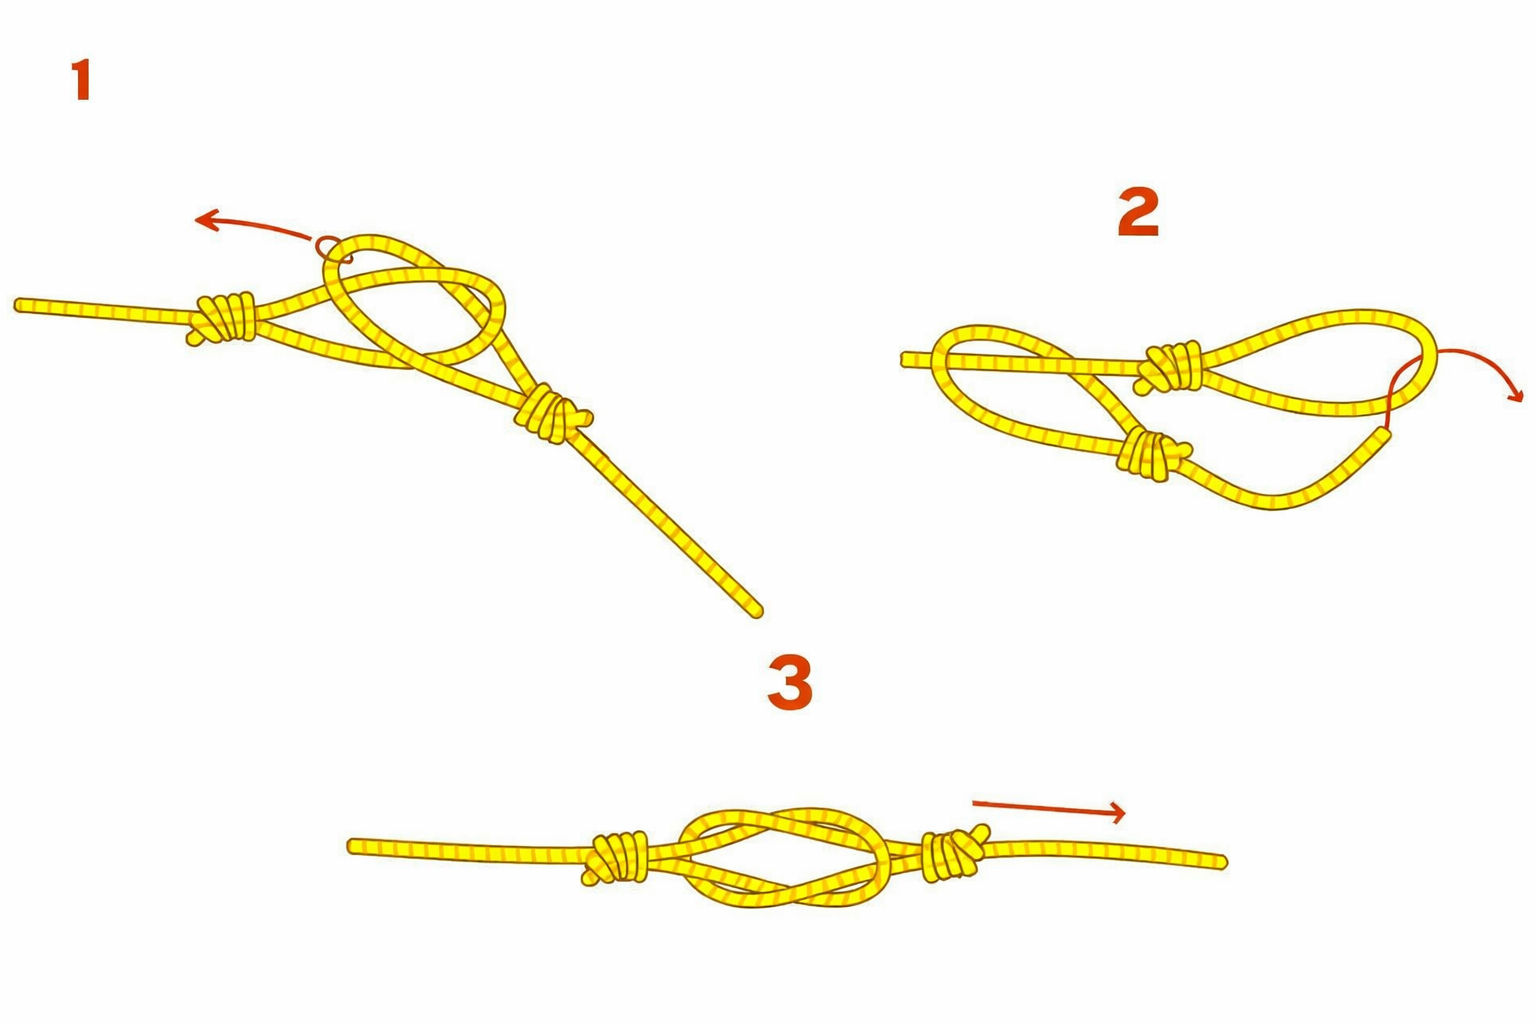
5. Blood Knot
Use: Joining two pieces of similar-diameter monofilament or fluorocarbon
The blood knot is the classic choice for building tapered leaders or extending your tippet. It works best when the two lines are close in diameter (within .002" of each other). For bigger diameter differences, use a surgeon's knot instead.
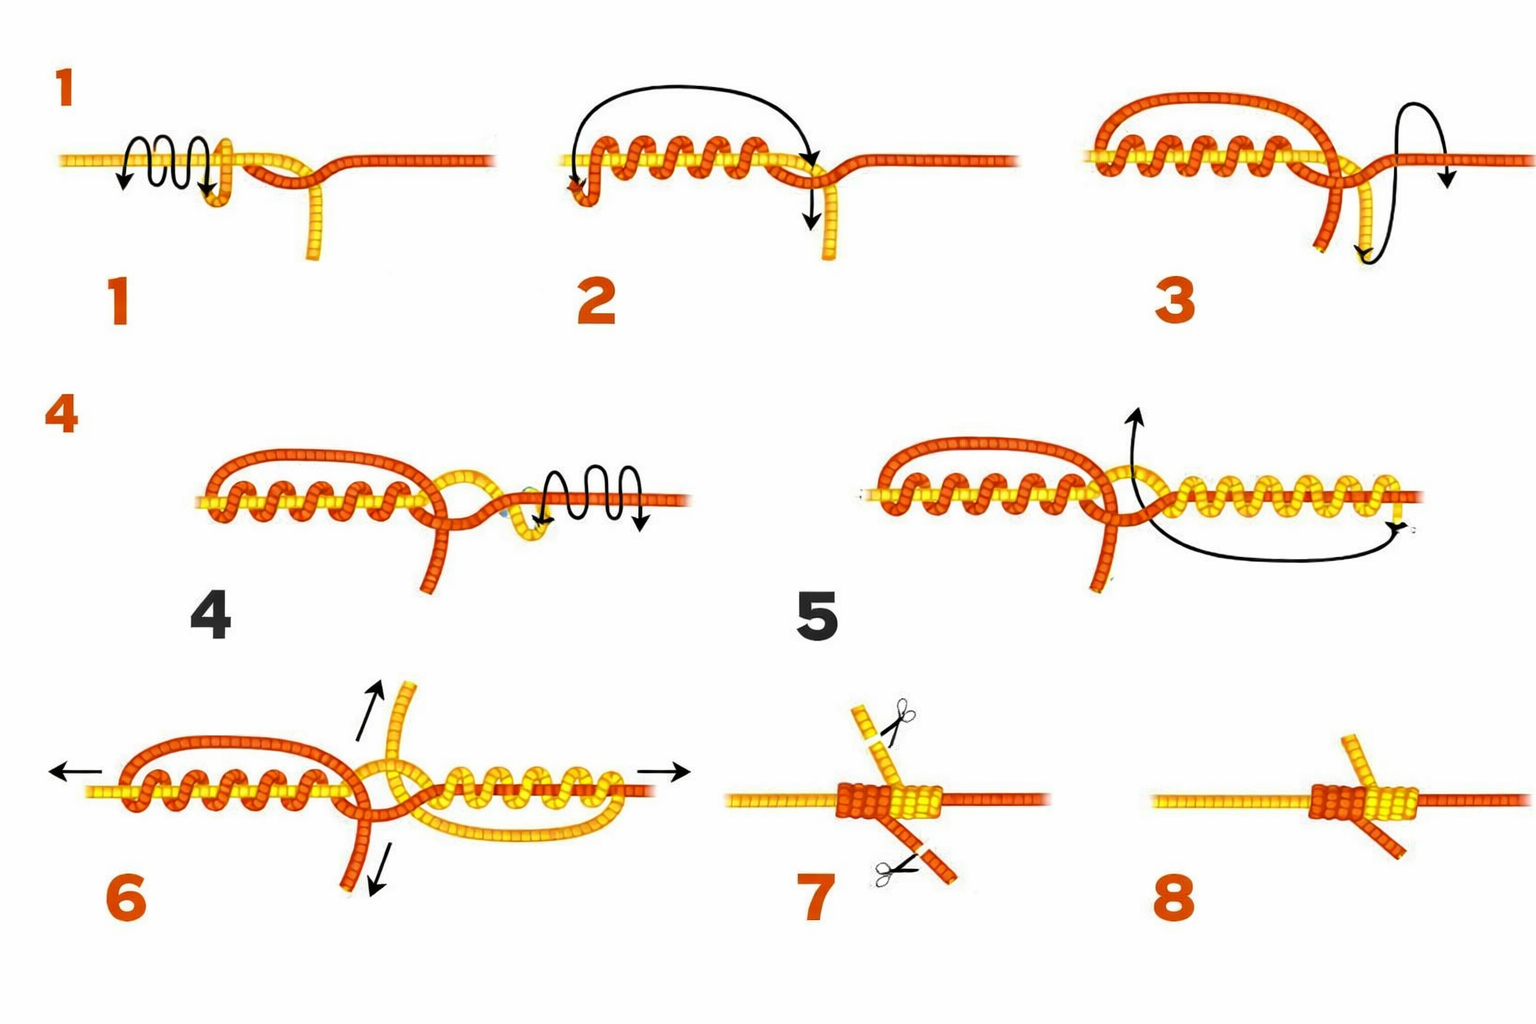
Steps:
- Overlap the two line ends by about 6 inches
- Wrap one tag end around the other standing line 5-7 times
- Bring that tag end back and thread it through the gap where the lines cross
- Repeat with the other line, wrapping in the opposite direction
- Thread the second tag end through the same center gap, but from the opposite side
- Moisten and pull both standing lines to tighten; trim tags
6. Surgeon's Knot (Double Surgeon's)
Use: Attaching tippet to leader, especially with different diameters
The surgeon's knot is the easiest knot for connecting two lines and works beautifully even when diameters differ significantly. The double version (two passes through the loop) is standard and provides excellent strength.
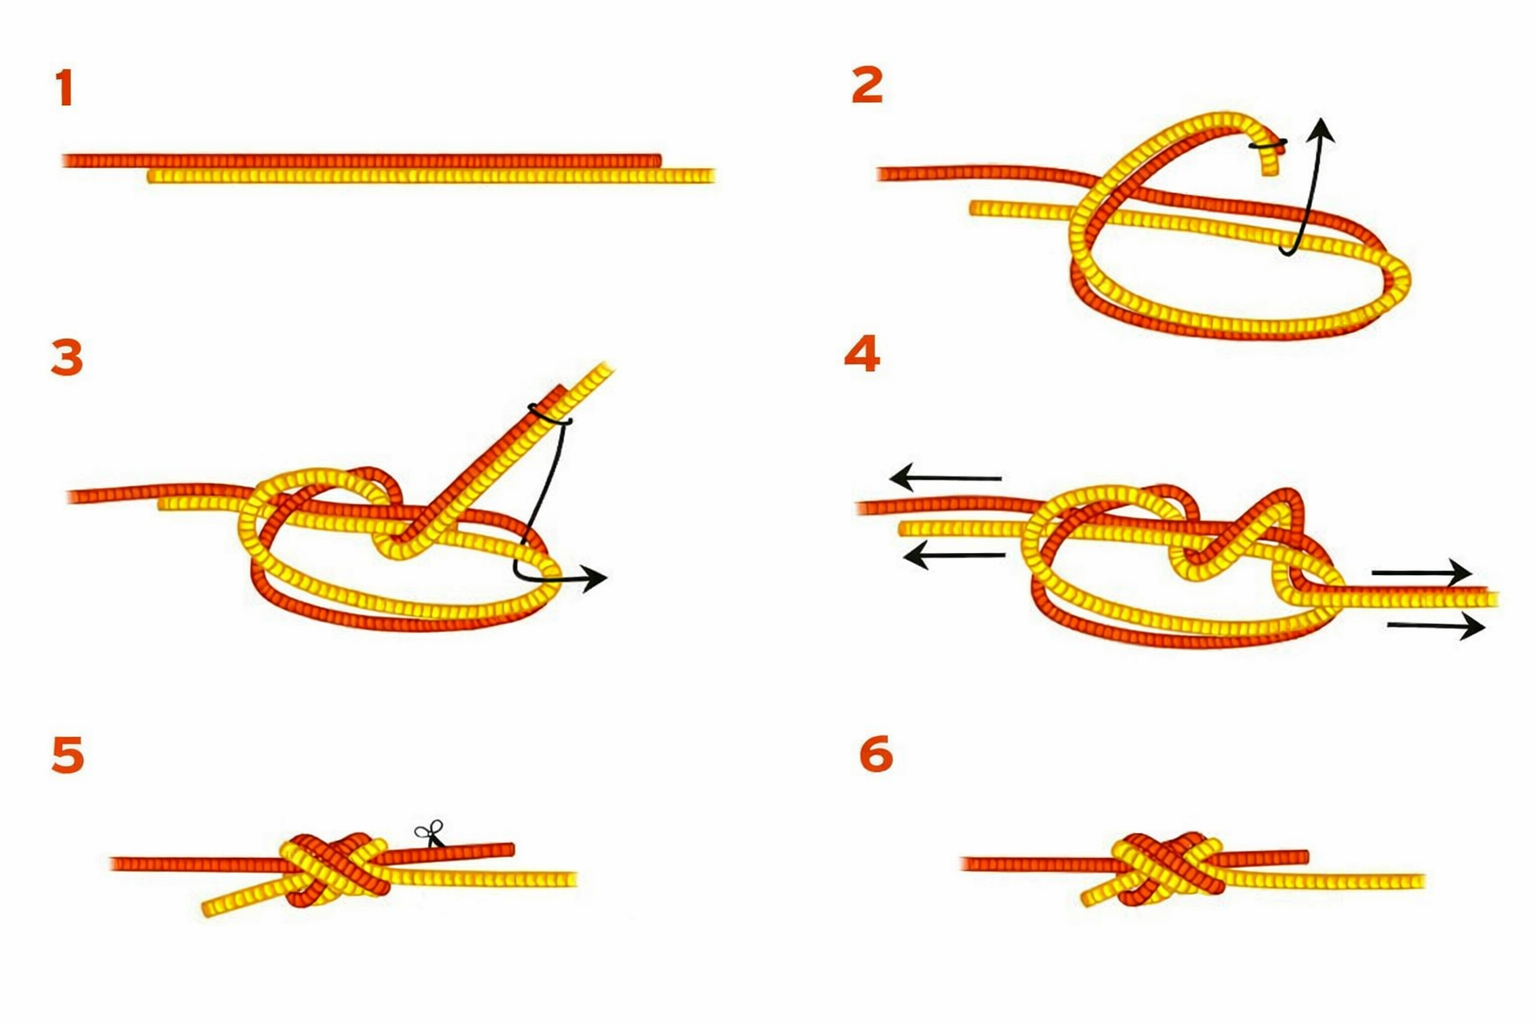
Steps:
- Lay the leader and tippet alongside each other, overlapping by 6 inches
- Treat both lines as one and form a simple overhand loop
- Pass both tag ends through the loop twice (this makes it a "double" surgeon's)
- Moisten the knot thoroughly
- Pull all four ends simultaneously to tighten evenly
- Trim both tag ends close to the knot
7. Uni Knot
Use: Versatile knot for tying fly to tippet, or joining lines
The uni knot (also called the Duncan loop or grinner knot) is incredibly versatile. It can attach flies, join lines, or even connect backing to the reel. Learn this one knot well and you can handle most situations.
Steps:
- Pass the line through the hook eye, leaving 6 inches of tag
- Form a loop by laying the tag parallel to the standing line
- Wrap the tag end around both lines and through the loop 5-6 times
- Moisten and pull the tag end to gather the wraps
- Slide the knot down to the hook eye by pulling the standing line
- Final tighten and trim
8. Double Uni Knot
Use: Joining two lines, especially of different materials or diameters
The double uni combines two uni knots facing each other. It's excellent for connecting braided backing to mono, fluorocarbon to mono, or any two lines that might be difficult to join with a blood knot.
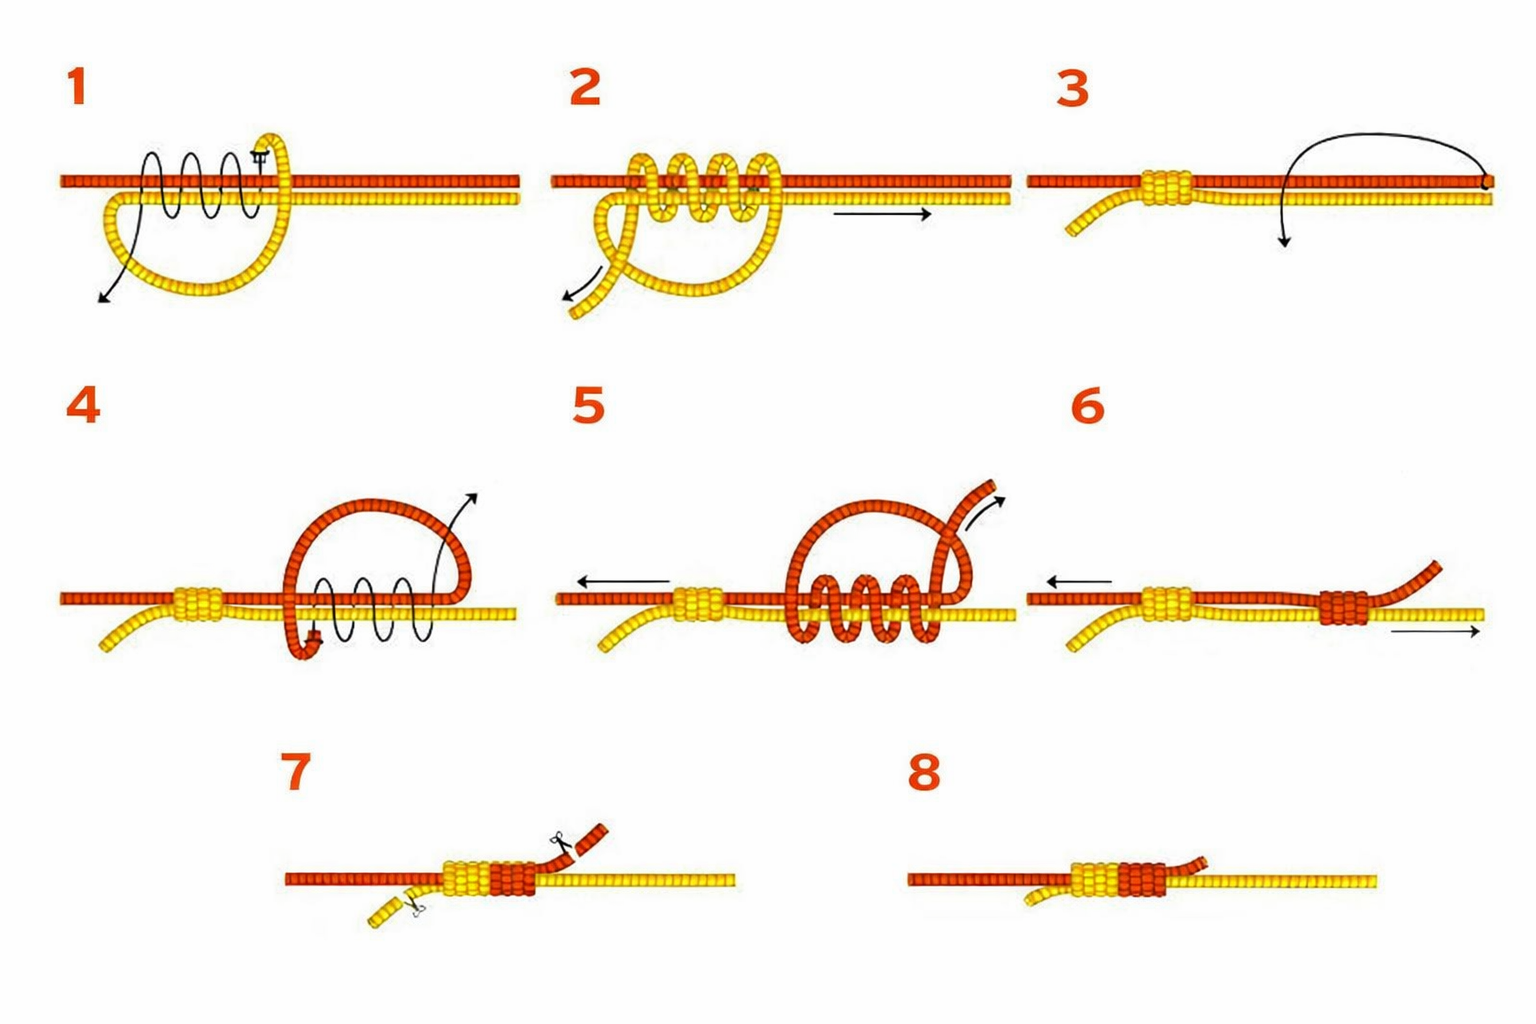
Steps:
- Overlap the two lines by about 8 inches
- Form a loop with line A and make 3-6 uni knot wraps around line B
- Tighten this first uni knot, but don't slide it down yet
- Repeat with line B, wrapping around line A in the opposite direction
- Moisten both knots
- Pull the standing lines to slide the two knots together until they meet
- Trim both tag ends
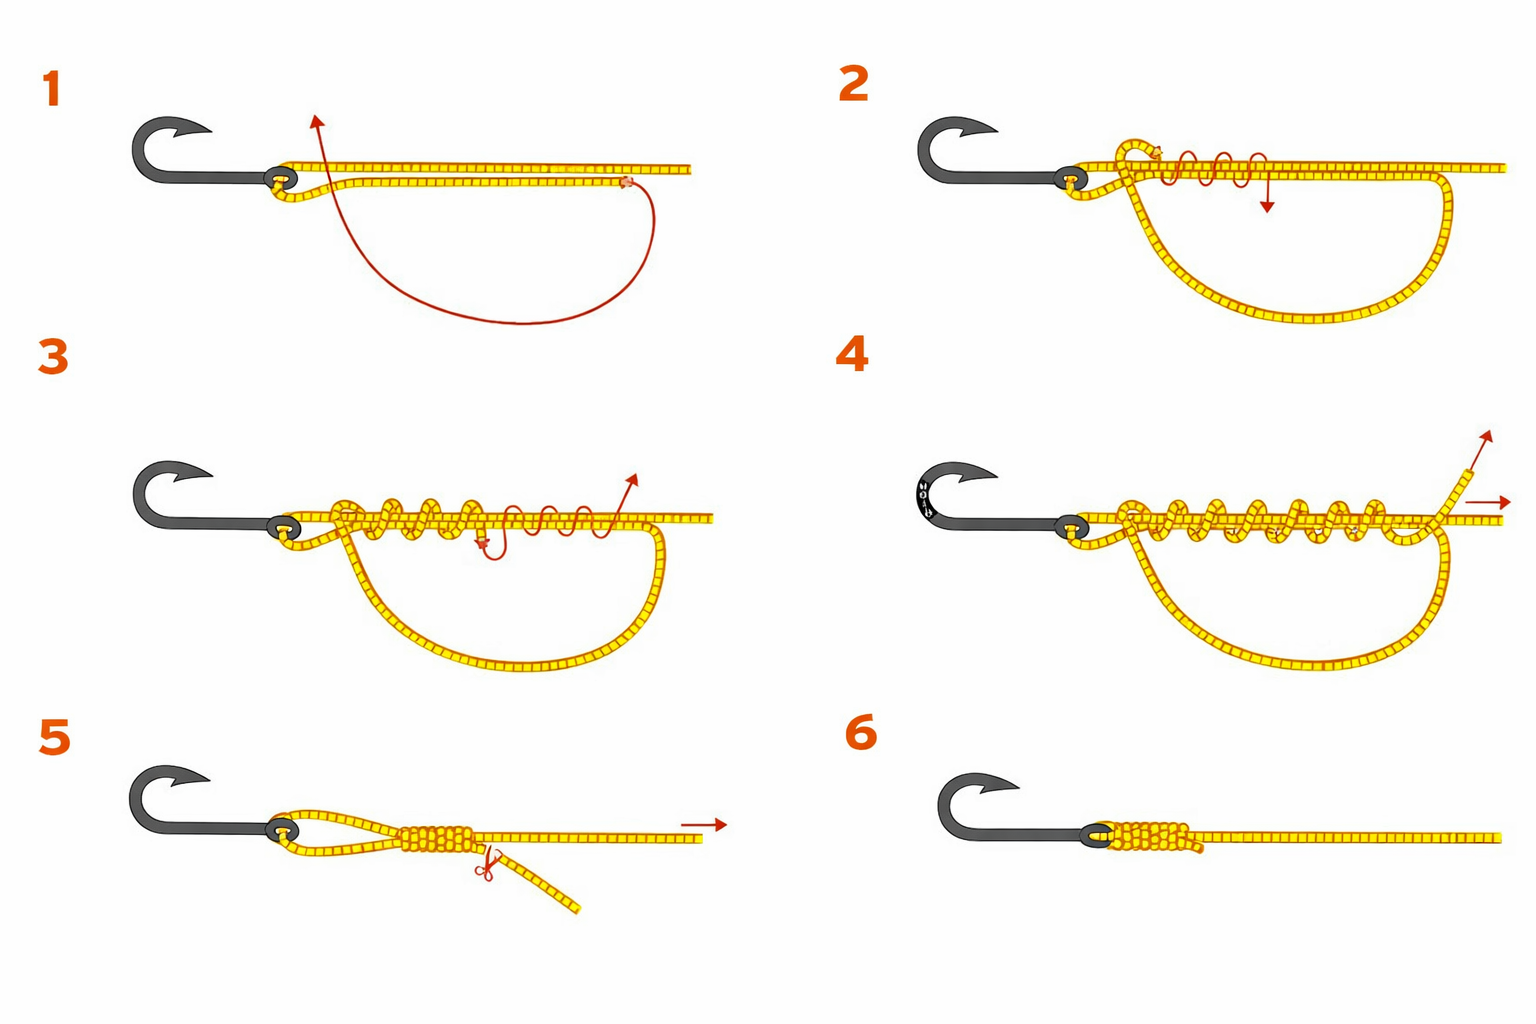
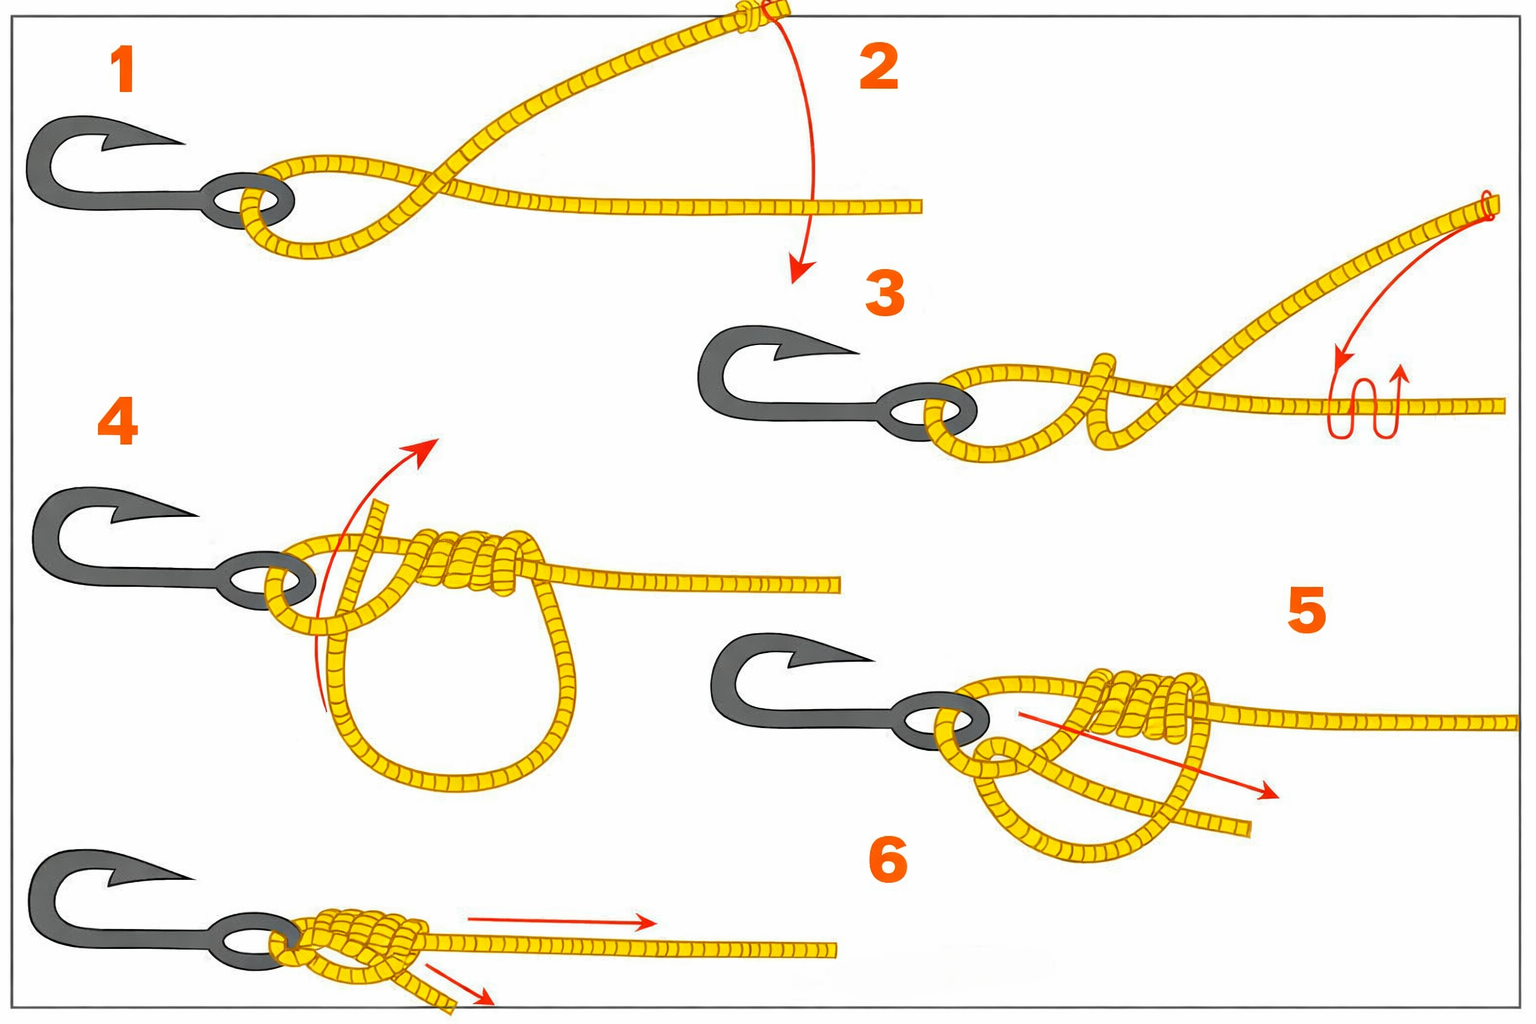
9. Clinch Knot
Use: Tying fly to tippet (lighter tippets and smaller flies)
The basic clinch knot has been connecting flies to leaders for generations. It's fast, easy to tie in low light, and perfectly adequate for lighter tippets. For heavier applications, use the improved version below.
Steps:
- Thread 5-6 inches of tippet through the hook eye
- Wrap the tag end around the standing line 5-7 times (more wraps for thinner line)
- Pass the tag end through the small loop formed just above the hook eye
- Moisten and pull the standing line to tighten
- Trim the tag end close
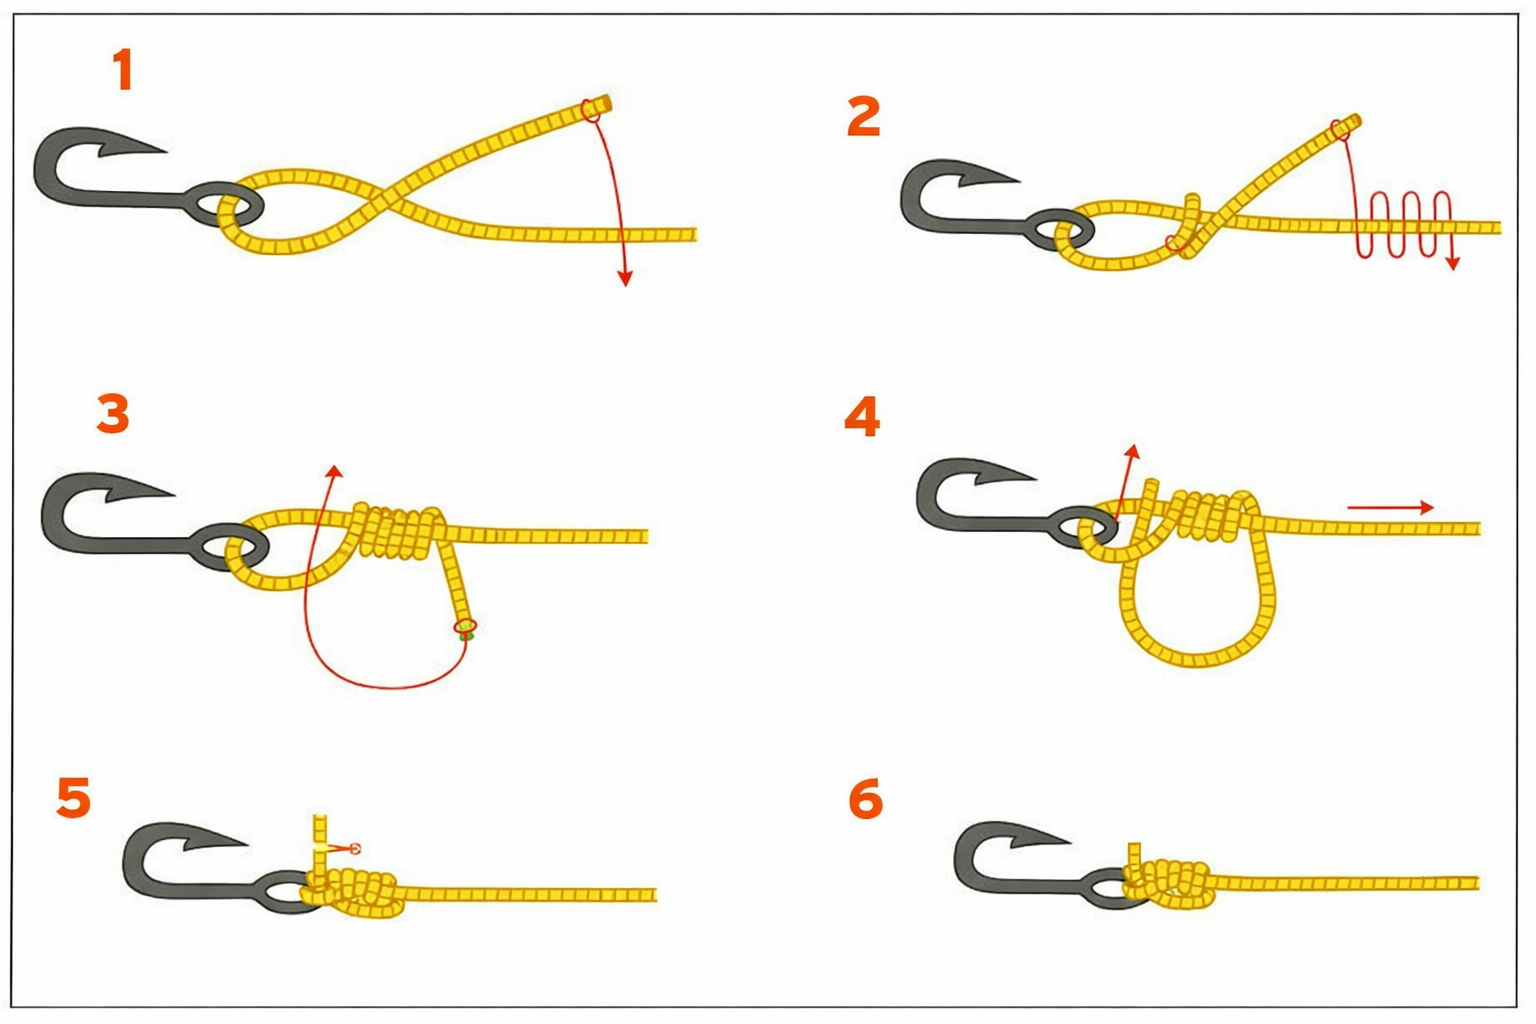
10. Improved Clinch Knot
Use: Tying fly to tippet (the go-to knot for most situations)
Adding one extra tuck transforms the basic clinch into a significantly stronger knot. This is the knot most fly fishers use daily for attaching flies. It's reliable, fast, and holds well with modern tippet materials.
Steps:
- Thread 5-6 inches of tippet through the hook eye
- Wrap the tag end around the standing line 5-7 times
- Pass the tag end through the small loop above the hook eye (just like the basic clinch)
- Now pass the tag end through the large loop you just created between the wraps and the first pass
- Moisten thoroughly and pull the standing line to tighten
- The knot should snug neatly against the hook eye; trim the tag
Quick Reference Chart
| Connection | Best Knot | Backup Option |
|---|---|---|
| Backing → Reel | Arbor Knot | — |
| Backing → Fly Line | Nail Knot | Loop-to-Loop |
| Fly Line → Leader | Loop-to-Loop | Nail Knot |
| Leader Sections | Blood Knot | Surgeon's Knot |
| Leader → Tippet | Surgeon's Knot | Blood Knot |
| Tippet → Fly | Improved Clinch | Uni Knot |
| Different Materials | Double Uni | Surgeon's Knot |
Final Tips for Knot Success
Always moisten your knots before tightening. Dry monofilament and fluorocarbon generate friction heat that weakens the line. A quick touch of saliva makes a real difference.
Test every knot with a firm pull before fishing. Better to find a weak knot now than when a fish is on.
Trim tags close but not flush. Leave about 1/16" to prevent the knot from slipping under pressure.
Practice at home with old leader material. Tie each knot twenty times while watching TV, and your hands will remember when you need them on the water.
When in doubt, re-tie. If a knot doesn't look right or feel right, cut it off and start fresh. The few seconds spent re-tying beats the heartbreak of losing a fish to a bad knot.
Now get out there and practice. Your future trophy fish is counting on it.